Docker, microservices, Continuous Delivery are currently some of the most popular topics in the world of programming. In an environment consisting of dozens of microservices communicating with each other, it seems to be particularly important the automation of the testing, building, and deployment process. Docker is an excellent solution for microservices because it can create and run isolated containers with service.
Today, I’m going to present you how to create a basic Continuous Delivery pipeline for sample microservices using a popular software automation tool: Jenkins.
Sample Microservices
Before I get into the main topic of this article, I’ll say a few words about structure and tools used for sample microservices creation. The sample application consists of two sample microservices communicating with each other (account, customer), a discovery server (Eureka), and an API gateway (Zuul). It was implemented using Spring Boot and Spring Cloud frameworks. Its source code is available on GitHub. Spring Cloud has support for microservices discovery and gateway out of the box — we only have to define right dependencies inside maven project configuration file (pom.xml).
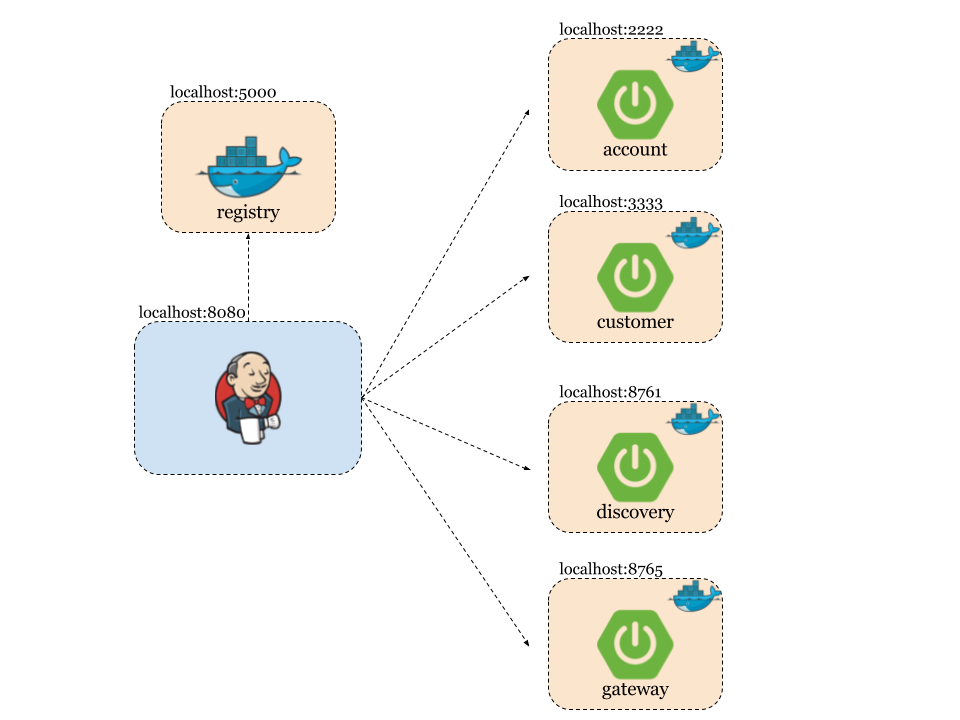
The picture illustrating the adopted solution architecture is visible below. Customer, account REST API services, discovery server, and gateway are running inside separated Docker containers. Gateway is the entry point to the microservices system. It is interacting with all other services. It proxies requests to the selected microservices searching its addresses in discovery service. In the case of there being more than one instance of each account or customer microservice, the request is load balanced with Ribbon and Feign clients.
Account and customer services are registering themselves into the discovery server after startup. There is also a possibility of interaction between them — for example, if we would like to find and return all customer’s account details.
I wouldn’t like to go into the details of those microservices implementation with Spring Boot and Spring Cloud frameworks. If you are interested in a detailed description of the sample application development, you can read it in my blog post here. Generally, Spring framework has a full support for microservices with all Netflix OSS tools like Ribbon, Hystrix, and Eureka. In the blog post, I described how to implement service discovery, distributed tracing, load balancing, logging trace ID propagation, and API gateway for microservices with those solutions.
Dockerfiles
Each service in the sample source code has a Dockerfile with a Docker image build definition. It’s really simple. Here’s Dockerfile for account service. We use OpenJDK as a base image. A JAR file from the target is added to the image and then run using the java -jar command. Service is running on port 2222, which is exposed outside.
FROM openjdk
MAINTAINER Piotr Minkowski <piotr.minkowski@gmail.com>
ADD target/account-service.jar account-service.jar
ENTRYPOINT ["java", "-jar", "/account-service.jar"]
EXPOSE 2222
We also had to set main class in the JAR manifest. We achieve it using spring-boot-maven-plugin in module pom.xml. The fragment is visible below. We also set build finalName to cut off version number from target JAR file. The Dockerfile and Maven build definition is pretty similar for all other microservices.
<build>
<finalName>account-service</finalName>
<plugins>
<plugin>
<groupId>org.springframework.boot</groupId>
<artifactId>spring-boot-maven-plugin</artifactId>
<version>1.5.2.RELEASE</version>
<configuration>
<mainClass>pl.piomin.microservices.account.Application</mainClass>
<addResources>true</addResources>
</configuration>
<executions>
<execution>
<goals>
<goal>repackage</goal>
</goals>
</execution>
</executions>
</plugin>
</plugins>
</build>
Jenkins Pipelines
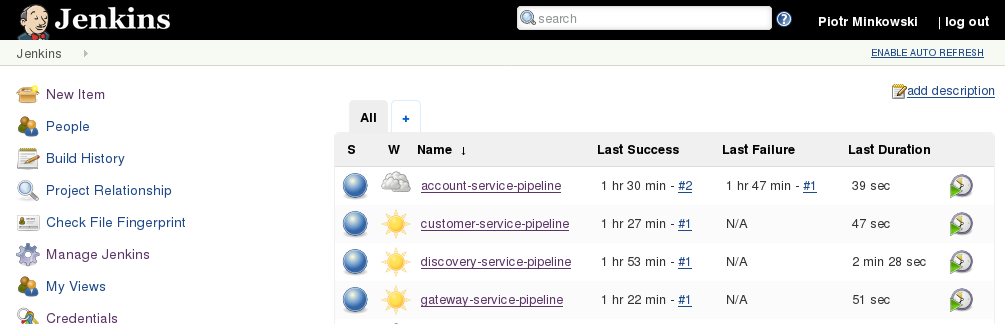
We use Pipeline Plugin for building Continuous Delivery for our microservices. In addition to the standard plugins set on Jenkins, we also need Docker Pipeline Plugin by CloudBees. There are four pipelines defined, as you can see in the picture below.
Here’s the pipeline definition written in Groovy language for discovery service. We have five stages of execution. Inside the Checkout stage, we are pulling changes for remote Git repository of the project. Then project is built with the MVN clean install command and the Maven version is read from pom.xml. In the Image stage, we build a Docker image from discovery service Dockerfile and then push that image to local registry. In the fourth step, we are running the built image with default port exposed and hostname visible for linked docker containers. Finally, the account pipeline is started with no wait option, which means that source pipeline is finished and won’t wait for account pipeline execution finish.
node {
withMaven(maven:'maven') {
stage('Checkout') {
git url: 'https://github.com/piomin/sample-spring-microservices.git', credentialsId: 'github-piomin', branch: 'master'
}
stage('Build') {
sh 'mvn clean install'
def pom = readMavenPom file:'pom.xml'
print pom.version
env.version = pom.version
}
stage('Image') {
dir ('discovery-service') {
def app = docker.build "localhost:5000/discovery-service:${env.version}"
app.push()
}
}
stage ('Run') {
docker.image("localhost:5000/discovery-service:${env.version}").run('-p 8761:8761 -h discovery --name discovery')
}
stage ('Final') {
build job: 'account-service-pipeline', wait: false
}
}
}
Account pipeline is very similar. The main difference is inside the fourth stage where account service container is linked to discovery container. We need to link those containers because account-service is registering itself in discovery server and must be able to connect it using hostname.
node {
withMaven(maven:'maven') {
stage('Checkout') {
git url: 'https://github.com/piomin/sample-spring-microservices.git', credentialsId: 'github-piomin', branch: 'master'
}
stage('Build') {
sh 'mvn clean install'
def pom = readMavenPom file:'pom.xml'
print pom.version
env.version = pom.version
}
stage('Image') {
dir ('account-service') {
def app = docker.build "localhost:5000/account-service:${env.version}"
app.push()
}
}
stage ('Run') {
docker.image("localhost:5000/account-service:${env.version}").run('-p 2222:2222 -h account --name account --link discovery')
}
stage ('Final') {
build job: 'customer-service-pipeline', wait: false
}
}
}
Similar pipelines are also defined for customer and gateway service. They are available in main project catalog on each microservice as a Jenkinsfile. Every image which is built during pipeline execution is also pushed to local Docker registry. To enable local registry on our host, we need to pull and run Docker registry image and also use that registry address as an image name prefix while pulling or pushing. The local registry is exposed on its default 5000 port. You can see the list of pushed images to the local registry by calling its REST API, for example, http://localhost:5000/v2/_catalog.
docker run -d --name registry -p 5000:5000 registry
Testing
You should launch the build on discovery-service-pipeline. This pipeline will not only run build for discovery service but also call start next pipeline build (account-service-pipeline) at the end.
The same rule is configured for account-service-pipeline which callscustomer-service-pipeline and for customer-service-pipeline, which callgateway-service-pipeline.
So, after all of the pipelines finish, you can check the list of running docker containers by calling the docker ps command. You should have seen five containers: local registry and our four microservices.
You can also check the logs of each container by running command docker logs — for example,docker logs account. If everything works fine, you should be able to call a service like http://localhost:2222/accounts or via the Zuul gateway http://localhost:8765/account/account.
CONTAINER ID IMAGE COMMAND CREATED STATUS PORTS NAMES
fa3b9e408bb4 localhost:5000/gateway-service:1.0-SNAPSHOT "java -jar /gatewa..." About an hour ago Up About an hour 0.0.0.0:8765->8765/tcp gateway
cc9e2b44fe44 localhost:5000/customer-service:1.0-SNAPSHOT "java -jar /custom..." About an hour ago Up About an hour 0.0.0.0:3333->3333/tcp customer
49657f4531de localhost:5000/account-service:1.0-SNAPSHOT "java -jar /accoun..." About an hour ago Up About an hour 0.0.0.0:2222->2222/tcp account
fe07b8dfe96c localhost:5000/discovery-service:1.0-SNAPSHOT "java -jar /discov..." About an hour ago Up About an hour 0.0.0.0:8761->8761/tcp discovery
f9a7691ddbba registry "/entrypoint.sh /e..." About an hour ago Up About an hour 0.0.0.0:5000->5000/tcp registry
Conclusion
I have presented the basic sample of Continuous Delivery environment for microservices using Docker and Jenkins. You can easily find out the limitations of presented solution. For example, we have linked Docker containers with each other to enable communication between them or all of the tools and microservices are running on the same machine.
For a more advanced sample, we could use Jenkins slaves running on different machines or Docker containers (more here), tools like Kubernetes for orchestration and clustering, or maybe Docker-in-Docker containers for simulating multiple Docker machines. I hope that this article is a fine introduction to microservices and Continuous Delivery and helps you to understand the basics of this idea. I think that you can expect more of my advanced articles about this subject near the future.