操作环境
网络拓扑图
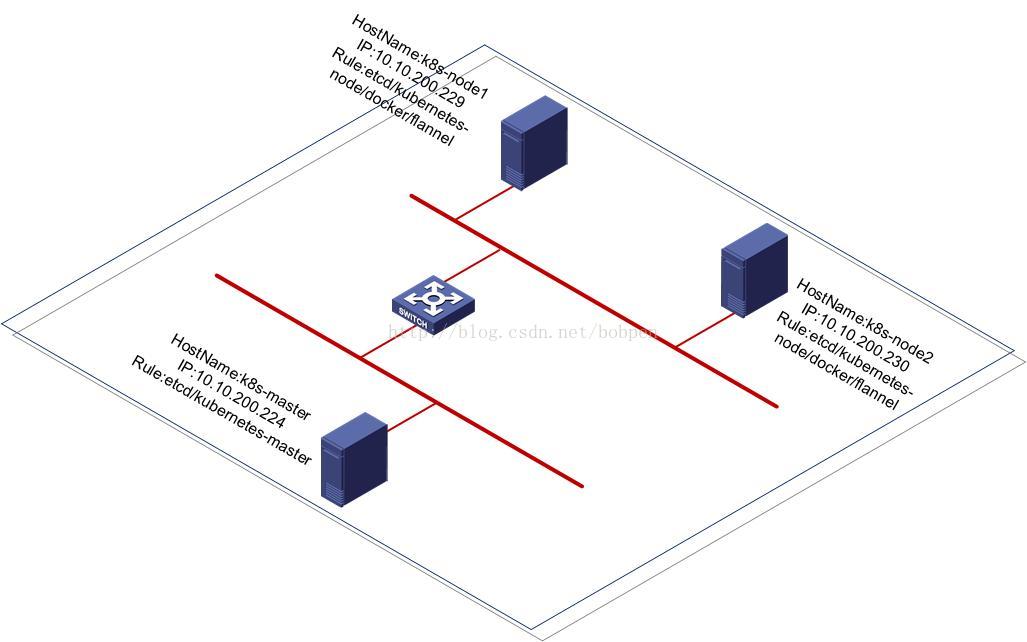 、
、操作环境:
k8s-master:
OS:
-
[root@k8s-master ~]# cat /etc/redhat-release
-
CentOS Linux release 7.4.1708 (Core)
etcd:
-
[root@k8s-master ~]# etcd –version
-
etcd Version: 3.2.9
-
Git SHA: f1d7dd8
-
Go Version: go1.8.3
-
Go OS/Arch: linux/amd64
Kubernetes:
-
[root@k8s-master ~]# kubectl version
-
Client Version: version.Info{Major:”1″, Minor:”5″, GitVersion:”v1.5.2″, GitCommit:”269f928217957e7126dc87e6adfa82242bfe5b1e”, GitTreeState:”clean”, BuildDate:”2017-07-03T15:31:10Z”, GoVersion:”go1.7.4″, Compiler:”gc”, Platform:”linux/amd64″}
-
Server Version: version.Info{Major:”1″, Minor:”5″, GitVersion:”v1.5.2″, GitCommit:”269f928217957e7126dc87e6adfa82242bfe5b1e”, GitTreeState:”clean”, BuildDate:”2017-07-03T15:31:10Z”, GoVersion:”go1.7.4″, Compiler:”gc”, Platform:”linux/amd64″}
k8s-node1&k8s-node2:
OS:
-
[root@k8s-node1 ~]# cat /etc/redhat-release
-
CentOS Linux release 7.4.1708 (Core)
etcd:
-
[root@k8s-node1 ~]# etcd –version
-
etcd Version: 3.2.9
-
Git SHA: f1d7dd8
-
Go Version: go1.8.3
-
Go OS/Arch: linux/amd64
docker:
-
[root@k8s-node1 ~]# docker version
-
Client:
-
Version: 1.12.6
-
API version: 1.24
-
Package version: docker-1.12.6-68.gitec8512b.el7.centos.x86_64
-
Go version: go1.8.3
-
Git commit: ec8512b/1.12.6
-
Built: Mon Dec 11 16:08:42 2017
-
OS/Arch: linux/amd64
-
-
Server:
-
Version: 1.12.6
-
API version: 1.24
-
Package version: docker-1.12.6-68.gitec8512b.el7.centos.x86_64
-
Go version: go1.8.3
-
Git commit: ec8512b/1.12.6
-
Built: Mon Dec 11 16:08:42 2017
-
OS/Arch: linux/amd64
Kubernetes:
-
[root@k8s-node1 ~]# kubectl version
-
Client Version: version.Info{Major:”1″, Minor:”5″, GitVersion:”v1.5.2″, GitCommit:”269f928217957e7126dc87e6adfa82242bfe5b1e”, GitTreeState:”clean”, BuildDate:”2017-07-03T15:31:10Z”, GoVersion:”go1.7.4″, Compiler:”gc”, Platform:”linux/amd64″}
安装部署
安装前准备
在安装部署集群前,先将三台服务器的时间通过NTP进行同步,否则,在后面的运行中可能会提示错误
[root@k8s-node1 ~]# ntpdate -u cn.pool.ntp.org在node节点上安装redhat-ca.crt
[root@k8s-node1 ~]# yum install *rhsm* -yetcd集群配置
master节点配置
1.安装kubernetes etcd
[root@k8s-master ~]# yum -y install kubernetes-master etcd2.配置etcd选项
ETCD_DATA_DIR/ETCD_LISTEN_PEER_URLS/ETCD_LISTEN_CLIENT_URLS/ETCD_MAX_SNAPSHOTS/ETCD_NAME/ETCD_INITIAL_ADVERTISE_PEERURLS/ETCD_ADVERTISE_CLIENT_URLS/ETCD_INITIAL_CLUSTER
-
[root@k8s-master ~]# vi /etc/etcd/etcd.conf
-
#[Member]
-
#ETCD_CORS=””
-
ETCD_DATA_DIR=”/var/lib/etcd/default.etcd”
-
#ETCD_WAL_DIR=””
-
ETCD_LISTEN_PEER_URLS=”http://10.10.200.224:2380″
-
ETCD_LISTEN_CLIENT_URLS=”http://10.10.200.224:2379,http://127.0.0.1:2379″
-
ETCD_MAX_SNAPSHOTS=”5″
-
#ETCD_MAX_WALS=”5″
-
ETCD_NAME=”etcd1″
-
#ETCD_SNAPSHOT_COUNT=”100000″
-
#ETCD_HEARTBEAT_INTERVAL=”100″
-
#ETCD_ELECTION_TIMEOUT=”1000″
-
#ETCD_QUOTA_BACKEND_BYTES=”0″
-
#
-
#[Clustering]
-
ETCD_INITIAL_ADVERTISE_PEER_URLS=”http://10.10.200.224:2380″
-
ETCD_ADVERTISE_CLIENT_URLS=”http://10.10.200.224:2379″
-
#ETCD_DISCOVERY=””
-
#ETCD_DISCOVERY_FALLBACK=”proxy”
-
#ETCD_DISCOVERY_PROXY=””
-
#ETCD_DISCOVERY_SRV=””
-
ETCD_INITIAL_CLUSTER=”etcd1=http://10.10.200.224:2380,etcd2=http://10.10.200.229:2380,etcd3=http://10.10.200.230:2380″
-
#ETCD_INITIAL_CLUSTER_TOKEN=”etcd-cluster”
-
#ETCD_INITIAL_CLUSTER_STATE=”new”
-
#ETCD_STRICT_RECONFIG_CHECK=”true”
-
#ETCD_ENABLE_V2=”true”
-
#
-
#[Proxy]
-
#ETCD_PROXY=”off”
-
#ETCD_PROXY_FAILURE_WAIT=”5000″
-
#ETCD_PROXY_REFRESH_INTERVAL=”30000″
-
#ETCD_PROXY_DIAL_TIMEOUT=”1000″
-
#ETCD_PROXY_WRITE_TIMEOUT=”5000″
-
#ETCD_PROXY_READ_TIMEOUT=”0″
-
#
-
#[Security]
-
#ETCD_CERT_FILE=””
-
#ETCD_KEY_FILE=””
-
#ETCD_CLIENT_CERT_AUTH=”false”
-
#ETCD_TRUSTED_CA_FILE=””
-
#ETCD_AUTO_TLS=”false”
-
#ETCD_PEER_CERT_FILE=””
-
#ETCD_PEER_KEY_FILE=””
-
#ETCD_PEER_CLIENT_CERT_AUTH=”false”
-
#ETCD_PEER_TRUSTED_CA_FILE=””
-
#ETCD_PEER_AUTO_TLS=”false”
-
#
-
#[Logging]
-
#ETCD_DEBUG=”false”
-
#ETCD_LOG_PACKAGE_LEVELS=””
-
#ETCD_LOG_OUTPUT=”default”
-
#
-
#[Unsafe]
-
#ETCD_FORCE_NEW_CLUSTER=”false”
-
#
-
#[Version]
-
#ETCD_VERSION=”false”
-
#ETCD_AUTO_COMPACTION_RETENTION=”0″
-
#
-
#[Profiling]
-
#ETCD_ENABLE_PPROF=”false”
-
#ETCD_METRICS=”basic”
-
#
-
#[Auth]
-
#ETCD_AUTH_TOKEN=”simple”
nodes节点配置
1.安装部署kubernetes-node/etcd/flannel/docker
[root@k8s-node1 ~]# yum -y install kubernetes-node etcd flannel docker2.分别配置etcd,node1与node2的配置方法相同,以node1配置文件为例说明
-
[root@k8s-node1 ~]# vi /etc/etcd/etcd.conf
-
#[Member]
-
#ETCD_CORS=””
-
ETCD_DATA_DIR=”/var/lib/etcd/default.etcd”
-
#ETCD_WAL_DIR=””
-
ETCD_LISTEN_PEER_URLS=”http://10.10.200.229:2380″
-
ETCD_LISTEN_CLIENT_URLS=”http://10.10.200.229:2379,http://127.0.0.1:2379″
-
#ETCD_MAX_SNAPSHOTS=”5″
-
#ETCD_MAX_WALS=”5″
-
ETCD_NAME=”etcd2″
-
#ETCD_SNAPSHOT_COUNT=”100000″
-
#ETCD_HEARTBEAT_INTERVAL=”100″
-
#ETCD_ELECTION_TIMEOUT=”1000″
-
#ETCD_QUOTA_BACKEND_BYTES=”0″
-
#
-
#[Clustering]
-
ETCD_INITIAL_ADVERTISE_PEER_URLS=”http://10.10.200.229:2380″
-
ETCD_ADVERTISE_CLIENT_URLS=”http://10.10.200.229:2379″
-
#ETCD_DISCOVERY=””
-
#ETCD_DISCOVERY_FALLBACK=”proxy”
-
#ETCD_DISCOVERY_PROXY=””
-
#ETCD_DISCOVERY_SRV=””
-
#ETCD_INITIAL_CLUSTER=”default=http://localhost:2380″
-
#ETCD_INITIAL_CLUSTER_TOKEN=”etcd-cluster”
-
“/etc/etcd/etcd.conf” 66L, 1696C
-
#[Member]
-
#ETCD_CORS=””
-
ETCD_DATA_DIR=”/var/lib/etcd/default.etcd”
-
#ETCD_WAL_DIR=””
-
ETCD_LISTEN_PEER_URLS=”http://10.10.200.229:2380″
-
ETCD_LISTEN_CLIENT_URLS=”http://10.10.200.229:2379,http://127.0.0.1:2379″
-
#ETCD_MAX_SNAPSHOTS=”5″
-
#ETCD_MAX_WALS=”5″
-
ETCD_NAME=”etcd2″
-
#ETCD_SNAPSHOT_COUNT=”100000″
-
#ETCD_HEARTBEAT_INTERVAL=”100″
-
#ETCD_ELECTION_TIMEOUT=”1000″
-
#ETCD_QUOTA_BACKEND_BYTES=”0″
-
#
-
#[Clustering]
-
ETCD_INITIAL_ADVERTISE_PEER_URLS=”http://10.10.200.229:2380″
-
ETCD_ADVERTISE_CLIENT_URLS=”http://10.10.200.229:2379″
-
#ETCD_DISCOVERY=””
-
#ETCD_DISCOVERY_FALLBACK=”proxy”
-
#ETCD_DISCOVERY_PROXY=””
-
#ETCD_DISCOVERY_SRV=””
-
#ETCD_INITIAL_CLUSTER=”default=http://localhost:2380″
-
#ETCD_INITIAL_CLUSTER_TOKEN=”etcd-cluster”
-
#ETCD_INITIAL_CLUSTER_STATE=”new”
-
#ETCD_STRICT_RECONFIG_CHECK=”true”
-
#ETCD_ENABLE_V2=”true”
-
ETCD_INITIAL_CLUSTER=”etcd1=http://10.10.200.224:2380,etcd2=http://10.10.200.229:2380,etcd3=http://10.10.200.230:2380″
-
#
-
#[Proxy]
-
#ETCD_PROXY=”off”
-
#ETCD_PROXY_FAILURE_WAIT=”5000″
-
#ETCD_PROXY_REFRESH_INTERVAL=”30000″
-
#ETCD_PROXY_DIAL_TIMEOUT=”1000″
-
#ETCD_PROXY_WRITE_TIMEOUT=”5000″
-
#ETCD_PROXY_READ_TIMEOUT=”0″
-
#
-
#[Security]
-
#ETCD_CERT_FILE=””
-
#ETCD_KEY_FILE=””
-
#ETCD_CLIENT_CERT_AUTH=”false”
-
#ETCD_TRUSTED_CA_FILE=””
-
#ETCD_AUTO_TLS=”false”
-
#ETCD_PEER_CERT_FILE=””
-
#ETCD_PEER_KEY_FILE=””
-
#ETCD_PEER_CLIENT_CERT_AUTH=”false”
-
#ETCD_PEER_TRUSTED_CA_FILE=””
-
#ETCD_PEER_AUTO_TLS=”false”
-
#
-
#[Logging]
-
#ETCD_DEBUG=”false”
-
#ETCD_LOG_PACKAGE_LEVELS=””
-
#ETCD_LOG_OUTPUT=”default”
-
#
-
#[Unsafe]
-
#ETCD_FORCE_NEW_CLUSTER=”false”
-
#
-
#[Version]
-
#ETCD_VERSION=”false”
-
#ETCD_AUTO_COMPACTION_RETENTION=”0″
-
#
-
#[Profiling]
-
#ETCD_ENABLE_PPROF=”false”
-
#ETCD_METRICS=”basic”
-
#
-
#[Auth]
-
#ETCD_AUTH_TOKEN=”simple”
启动etcd cluster
分别在3台服务器启动etcd
-
[root@k8s-master ~]# systemctl start etcd.service
-
[root@k8s-master ~]# systemctl status etcd.service
-
?etcd.service – Etcd Server
-
Loaded: loaded (/usr/lib/systemd/system/etcd.service; disabled; vendor preset: disabled)
-
Active: active (running) since Wed 2018-01-03 09:21:36 CST; 1h 41min ago
-
Main PID: 11426 (etcd)
-
CGroup: /system.slice/etcd.service
-
忖11426 /usr/bin/etcd –name=etcd1 –data-dir=/var/lib/etcd/default.etcd –listen-client-urls=http://10.10.200.224:2379,http://127.0.0.1:2379
查看etcd集群状态
-
[root@k8s-master ~]# etcdctl cluster-health
-
member 359947fae86629a7 is healthy: got healthy result from http://10.10.200.224:2379
-
member 4be7ddbd3bb99ca0 is healthy: got healthy result from http://10.10.200.229:2379
-
member 84951a697d1bf6a0 is healthy: got healthy result from http://10.10.200.230:2379
-
cluster is healthy
Kubernetes集群配置
master节点配置
1.apiserver配置文件修改,注意KUBE_ADMISSION_CONTROL选项的参数配置
-
[root@k8s-master ~]# vi /etc/kubernetes/apiserver
-
###
-
# kubernetes system config
-
#
-
# The following values are used to configure the kube-apiserver
-
#
-
-
# The address on the local server to listen to.
-
#KUBE_API_ADDRESS=”–insecure-bind-address=127.0.0.1″
-
KUBE_API_ADDRESS=”–address=0.0.0.0″
-
-
# The port on the local server to listen on.
-
KUBE_API_PORT=”–port=8080″
-
-
# Port minions listen on
-
KUBELET_PORT=”–kubelet-port=10250″
-
-
# Comma separated list of nodes in the etcd cluster
-
KUBE_ETCD_SERVERS=”–etcd-servers=http://10.10.200.224:2379,http://10.10.200.229:2379,http://10.10.200.230:2379″
-
-
# Address range to use for services
-
KUBE_SERVICE_ADDRESSES=”–service-cluster-ip-range=10.254.0.0/16″
-
-
# default admission control policies
-
#KUBE_ADMISSION_CONTROL=”–admission-control=NamespaceLifecycle,NamespaceExists,LimitRanger,SecurityContextDeny,ServiceAccount,ResourceQuota”
-
-
KUBE_ADMISSION_CONTROL=”–admission-control=NamespaceLifecycle,NamespaceExists,LimitRanger,ResourceQuota”
-
-
# Add your own!
-
KUBE_API_ARGS=””
2.启动服务
-
[root@k8s-master ~]# systemctl start kube-apiserver
-
[root@k8s-master ~]# systemctl start kube-controller-manager
-
[root@k8s-master ~]# systemctl start kube-scheduler
-
[root@k8s-master ~]# systemctl enable kube-apiserver
-
[root@k8s-master ~]# systemctl enable kube-controller-manager
-
[root@k8s-master ~]# systemctl enable kube-scheduler
nodes节点配置
1.配置config配置,node1&node2配置相同,以node1为例说明
-
[root@k8s-node1 ~]# vi /etc/kubernetes/config
-
###
-
# kubernetes system config
-
#
-
# The following values are used to configure various aspects of all
-
# kubernetes services, including
-
#
-
# kube-apiserver.service
-
# kube-controller-manager.service
-
# kube-scheduler.service
-
# kubelet.service
-
# kube-proxy.service
-
# logging to stderr means we get it in the systemd journal
-
KUBE_LOGTOSTDERR=”–logtostderr=true”
-
-
# journal message level, 0 is debug
-
KUBE_LOG_LEVEL=”–v=0″
-
-
# Should this cluster be allowed to run privileged docker containers
-
KUBE_ALLOW_PRIV=”–allow-privileged=false”
-
-
# How the controller-manager, scheduler, and proxy find the apiserver
-
KUBE_MASTER=”–master=http://10.10.200.224:8080″
2.配置kubelet
-
[root@k8s-node1 ~]# vi /etc/kubernetes/kubelet
-
###
-
# kubernetes kubelet (minion) config
-
-
# The address for the info server to serve on (set to 0.0.0.0 or “” for all interfaces)
-
KUBELET_ADDRESS=”–address=127.0.0.1″
-
-
# The port for the info server to serve on
-
# KUBELET_PORT=”–port=10250″
-
-
# You may leave this blank to use the actual hostname
-
KUBELET_HOSTNAME=”–hostname-override=10.10.200.229″
-
-
# location of the api-server
-
KUBELET_API_SERVER=”–api-servers=http://10.10.200.224:8080″
-
-
# pod infrastructure container
-
KUBELET_POD_INFRA_CONTAINER=”–pod-infra-container-image=registry.access.redhat.com/rhel7/pod-infrastructure:latest”
-
-
# Add your own!
-
KUBELET_ARGS=””
网络配置
这里使用flannel进行网络配置,已经在2个节点上安装,下面进行配置。
在节点上进行配置flannel
-
[root@k8s-node1 ~]# vi /etc/sysconfig/flanneld
-
# Flanneld configuration options
-
-
# etcd url location. Point this to the server where etcd runs
-
FLANNEL_ETCD_ENDPOINTS=”http://10.10.200.224:2379″
-
-
# etcd config key. This is the configuration key that flannel queries
-
# For address range assignment
-
FLANNEL_ETCD_PREFIX=”/atomic.io/network”
-
-
# Any additional options that you want to pass
-
#FLANNEL_OPTIONS=””
查看集群状态
-
[root@k8s-master ~]# kubectl get nodes
-
NAME STATUS AGE
-
10.10.200.229 Ready 1h
-
10.10.200.230 Ready 1h
-
[root@k8s-master ~]# etcdctl member list
-
359947fae86629a7: name=etcd1 peerURLs=http://10.10.200.224:2380 clientURLs=http://10.10.200.224:2379 isLeader=true
-
4be7ddbd3bb99ca0: name=etcd2 peerURLs=http://10.10.200.229:2380 clientURLs=http://10.10.200.229:2379 isLeader=false
-
84951a697d1bf6a0: name=etcd3 peerURLs=http://10.10.200.230:2380 clientURLs=http://10.10.200.230:2379 isLeader=false
-
[root@k8s-master ~]# etcdctl cluster-health
-
member 359947fae86629a7 is healthy: got healthy result from http://10.10.200.224:2379
-
member 4be7ddbd3bb99ca0 is healthy: got healthy result from http://10.10.200.229:2379
-
member 84951a697d1bf6a0 is healthy: got healthy result from http://10.10.200.230:2379
-
cluster is healthy
测试使用
在测试使用前,现在2个节点上手动下载pod images,以及测试使用的nginx images
-
[root@k8s-node1 ~]# docker pull registry.access.redhat.com/rhel7/pod-infrastructure:latest
-
-
[root@k8s-node1 ~]# docker pull nginx
运行nginx
-
[root@k8s-master ~]# kubectl run my-nginx –image=nginx –replicas=2 –port=80
-
deployment “my-nginx” created
查看pods
-
[root@k8s-master ~]# kubectl get pods
-
NAME READY STATUS RESTARTS AGE
-
my-nginx-379829228-55s8n 1/1 Running 0 39s
-
my-nginx-379829228-th5t1 1/1 Running 0 39s
可以在node节点上查看到对应的containers
-
[root@k8s-node1 ~]# docker ps
-
CONTAINER ID IMAGE COMMAND CREATED STATUS PORTS NAMES
-
1c32b101cb69 nginx “nginx -g ‘daemon off” About a minute ago Up About a minute k8s_my-nginx.a65fe6c_my-nginx-379829228-55s8n_default_7d5085b9-f035-11e7-a6c1-000c29183fc3_edf658c9
-
de9936bea577 registry.access.redhat.com/rhel7/pod-infrastructure:latest “/usr/bin/pod” About a minute ago Up About a minute k8s_POD.a8590b41_my-nginx-379829228-55s8n_default_7d5085b9-f035-11e7-a6c1-000c29183fc3_86d80c42
-
-
-
[root@k8s-node2 ~]# docker ps
-
CONTAINER ID IMAGE COMMAND CREATED STATUS PORTS NAMES
-
c064a3fef6d3 nginx “nginx -g ‘daemon off” 2 minutes ago Up 2 minutes k8s_my-nginx.a65fe6c_my-nginx-379829228-th5t1_default_7d50757d-f035-11e7-a6c1-000c29183fc3_a2431e86
-
85e437bc7eb7 registry.access.redhat.com/rhel7/pod-infrastructure:latest “/usr/bin/pod” 2 minutes ago Up 2 minutes k8s_POD.a8590b41_my-nginx-379829228-th5t1_default_7d50757d-f035-11e7-a6c1-000c29183fc3_419a9356
-
-
-
——————— 作者:bobpen 来源:CSDN 原文:https://blog.csdn.net/bobpen/article/details/78958675?utm_source=copy 版权声明:本文为博主原创文章,转载请附上博文链接!