内容概要
JBoss系列三主要目的是演示如何部署应用到JBoss7/WildFly,如下图中描述了部署应用的四种方式:
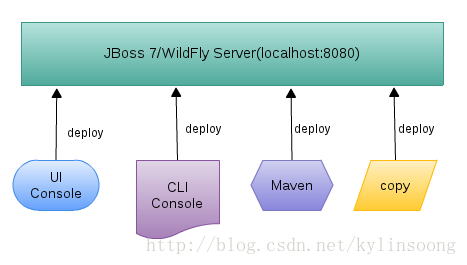
如上四种方式包括:
- Administration UI Console
- Command Line Console
- Maven Plugin(jboss-as-maven-plugin)
- copy
为了测试部署,我们需要编译生产部署的应用,使用git clone 我们本系列所需的测试代码(参照系列一github客户端安装部分),clone完成后进入系列三目录,也是我们这里所使用的测试工程,具体:
cd csdn/3/在该目录下执行Maven(Maven安装参照系列一Maven安装部分)编译系列三工程:
mvn clean install 编译完成后会生成jaxws-helloworld.jar,位于csdn/3/target目录下。启动JBoss并添加管理用户名(参照系列一JBoss安装)。接下来我们演示通过4中方式部署应用jaxws-helloworld.jar。
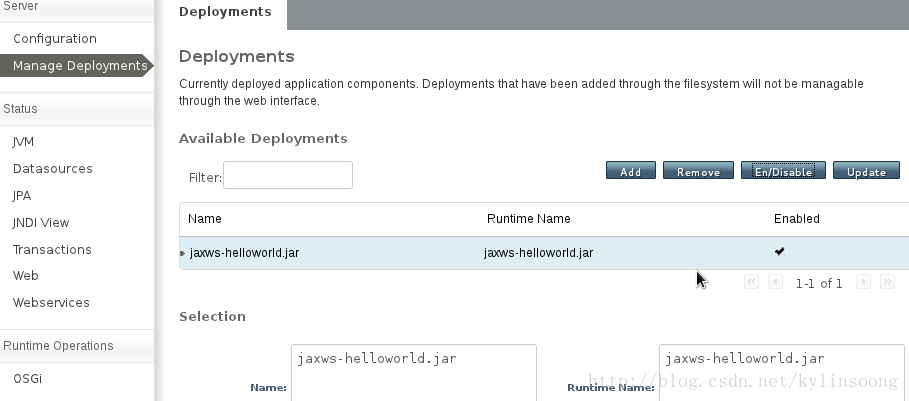
通过Administration UI Console部署
1. 使用管理用户登录到Administration UI Console(http://localhost:9990/console)。
2.部署
在显示出的界面选择 Runtime -> Server -> Manage Deployments -> Add -> Browse(选择jaxws-helloworld.jar绝对路径) -> Next -> Save -> En/Disable,部署完成如下图
通过Command Line Console部署
1. 进入到Command Line Console界面,连接到localhost:9999:
[kylin@localhost bin]$ ./jboss-cli.shYou are disconnected at the moment. Type 'connect' to connect to the server or 'help' for the list of supported commands.[disconnected /] connect [standalone@localhost:9999 /]
2. 使用deploy命令部署jaxws-helloworld.jar
[standalone@localhost:9999 /] deploy /home/kylin/work/project/csdn/3/target/jaxws-helloworld.jar同样使用
[standalone@localhost:9999 /] undeploy jaxws-helloworld.jar移除jaxws-helloworld.jar
使用Maven Plugin(jboss-as-maven-plugin)部署
1. 在pom.xml中配置了jboss-as-maven-plugin,如下:
<plugin> <groupId>org.jboss.as.plugins</groupId> <artifactId>jboss-as-maven-plugin</artifactId> <version>7.3.Final</version></plugin>
2. 使用如下Maven目录部署应用
[kylin@localhost 3]$ mvn jboss-as:deploy同样使用undeploy可以移除jaxws-helloworld.jar,如下
[kylin@localhost 3]$ mvn jboss-as:undeploy使用拷贝方式部署
1. 拷贝jaxws-helloworld.jar到JBOSS_HOME/standalone/deployments目录部署
2. 在JBOSS_HOME/standalone/deployments目录部署下创建jaxws-helloworld.jar.dodeploy文件,则JBoss会完成部署,完成后会生成jaxws-helloworld.jar.deployed文件如下:
[kylin@localhost deployments]$ cp /home/kylin/work/project/csdn/3/target/jaxws-helloworld.jar ./[kylin@localhost deployments]$ lsjaxws-helloworld.jar jaxws-helloworld.jar.deployed
部署完成检测
1.从日志检查部署是否完成
JBoss 启动终端输出如下信息表示部署完成:
12:36:25,096 INFO [org.jboss.web] (MSC service thread 1-6) JBAS018210: Registering web context: /jaxws-helloworld12:36:25,235 INFO [org.jboss.as.server] (DeploymentScanner-threads - 1) JBAS018559: Deployed "jaxws-helloworld.jar"
2. 运行测试代码
由于jaxws-helloworld.jar部署了一个简单的WebService应用到JBoss上,所以我们可以运行WebService客户程序进行测试。JBoss 7默认WebService使用Apache CXF实现,从CXF文档(http://cxf.apache.org/docs/how-do-i-develop-a-client.html)可以下五种方法编写客户端程序:
- WSDL2Java generated Client
- JAX-WS Proxy
- JAX-WS Dispatch APIs
- Simple Frontend Client Proxy
- Dynamic Client
这里我们使用JAX-WS API如下代码端:
import java.net.URL; import javax.xml.namespace.QName;import javax.xml.ws.Service; import com.kylin.jaxws.helloworld.HelloWorld; public class HelloWorldClient { public static void main(String[] args) throws Exception { final QName serviceName = new QName("com.kylin.jaxws.helloworld", "HelloWorldService"); final URL wsdlURL = new URL("http://localhost:8080/jaxws-helloworld/HelloWorldService/HelloWorldService?wsdl"); final Service service = Service.create(wsdlURL, serviceName); final HelloWorld helloworld = (HelloWorld) service.getPort(HelloWorld.class); System.out.println(helloworld.helloworld()); }}
运行如上代码Web Service 返回Hello World字符串,如下:
HelloWorld, JAX-WS!