https://www.cnblogs.com/zishengY/p/6819160.html
本文旨在提供最基本的,可以用于在生产环境进行Hadoop、HDFS分布式环境的搭建,对自己是个总结和整理,也能方便新人学习使用。
一、基础环境
在Linux上安装Hadoop之前,需要先安装两个程序:
1.1 安装说明
1. JDK 1.6或更高版本(本文所提到的安装的是jdk1.7);
2. SSH(安全外壳协议),推荐安装OpenSSH。
下面简述一下安装这两个程序的原因:
1. Hadoop是用Java开发的,Hadoop的编译及MapReduce的运行都需要使用JDK。
2. Hadoop需要通过SSH来启动salve列表中各台主机的守护进程,因此SSH也是必须安装的,即使是安装伪分布式版本(因为Hadoop并没有区分集群式和伪分布式)。对于伪分布式,Hadoop会采用与集群相同的处理方式,即依次序启动文件conf/slaves中记载的主机上的进程,只不过伪分布式中salve为localhost(即为自身),所以对于伪分布式Hadoop,SSH一样是必须的。
1.1 JDK的安装与配置
1、上传压缩包
我这里使用的是WinScp工具 上传jdk-7u76-linux-x64.tar.gz压缩包

2、解压压缩包
tar -zxvf jdk-7u76-linux-x64.tar.gz
3、将解压的目录移动到/usr/local目录下
mv /lutong/jdk1.7.0_76/ /usr/local/

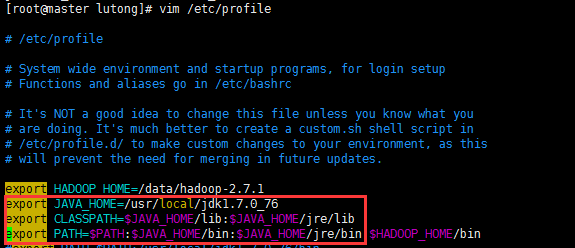
4、配置环境变量
vim /etc/profile
5、重新加载/etc/profile,使配置生效
source /etc/profile
6、查看配置是否生效
echo $PATH
java -version

出现如上信息表示已经配置好了。
二、Host配置
由于我搭建Hadoop集群包含三台机器,所以需要修改调整各台机器的hosts文件配置,进入/etc/hosts,配置主机名和ip的映射,命令如下:
vim /etc/hosts
如果没有足够的权限,可以切换用户为root。
三台机器的内容统一增加以下host配置:
可以通过hostname来修改服务器名称为master、slave1、slave2
hostname master

三、Hadoop的安装与配置
3.1 创建文件目录
为了便于管理,给Master的hdfs的NameNode、DataNode及临时文件,在用户目录下创建目录:
/data/hdfs/name
/data/hdfs/data
/data/hdfs/tmp
然后将这些目录通过scp命令拷贝到Slave1和Slave2的相同目录下。
首先到Apache官网(http://www.apache.org/dyn/closer.cgi/hadoop/common/)下载Hadoop,从中选择推荐的下载镜像(http://mirrors.hust.edu.cn/apache/hadoop/common/),我选择hadoop-2.6.0的版本,并使用以下命令下载到Master机器的
/data目录:
wget http://mirror.bit.edu.cn/apache/hadoop/common/hadoop-2.7.1/hadoop-2.7.1.tar.gz
然后使用以下命令将hadoop-2.7.1.tar.gz 解压缩到/data目录
tar -zxvf hadoop-2.7.1.tar.gz

3.3 配置环境变量
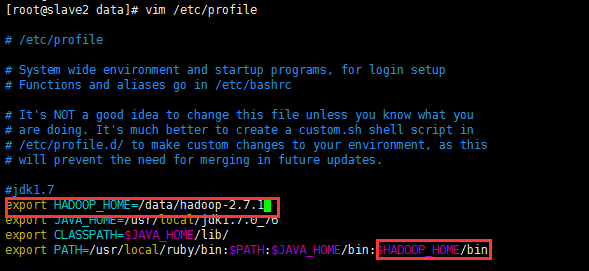
回到/data目录,配置hadoop环境变量,命令如下:
vim /etc/profile
在/etc/profile添加如下内容
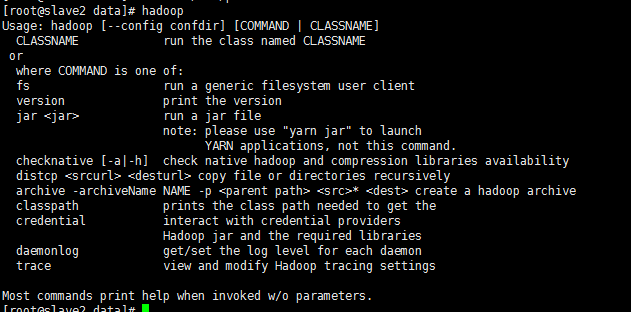
立刻让hadoop环境变量生效,执行如下命令:
source /etc/profile
再使用hadoop命令,发现可以有提示了,则表示配置生效了。
3.4 Hadoop的配置
进入hadoop-2.7.1的配置目录:
cd /data/hadoop-2.7.1/etc/hadoop
依次修改core-site.xml、hdfs-site.xml、mapred-site.xml、yarn-site.xml以及slaves文件。

3.4.1 修改core-site.xml
vim core-site.xml

 1 <?xml version="1.0" encoding="UTF-8"?>
 2 <?xml-stylesheet type="text/xsl" href="configuration.xsl"?>
 3 <!--
 4   Licensed under the Apache License, Version 2.0 (the "License");
 5   you may not use this file except in compliance with the License.
 6   You may obtain a copy of the License at
 7
 8     http://www.apache.org/licenses/LICENSE-2.0
 9   Unless required by applicable law or agreed to in writing, software
10   distributed under the License is distributed on an "AS IS" BASIS,
11   WITHOUT WARRANTIES OR CONDITIONS OF ANY KIND, either express or implied.
12   See the License for the specific language governing permissions and
13   limitations under the License. See accompanying LICENSE file.
14 -->
15
16 <!-- Put site-specific property overrides in this file. -->
17 <configuration>
18 <property>
19   <name>hadoop.tmp.dir</name>
20   <value>file:/data/hdfs/tmp</value>
21   <description>A base for other temporary directories.</description>
22 </property>
23 <property>
24   <name>io.file.buffer.size</name>
25   <value>131072</value>
26 </property>
27 <property>
28   <name>fs.default.name</name>
29   <value>hdfs://master:9000</value>
30 </property>
31 <property>
32 <name>hadoop.proxyuser.root.hosts</name>
33 <value>*</value>
34 </property>
35 <property>
36 <name>hadoop.proxyuser.root.groups</name>
37 <value>*</value>
38 </property>
39 </configuration>
注意:hadoop.tmp.dir的value填写对应前面创建的目录
3.4.2 修改vim hdfs-site.xml
vim hdfs-site.xml
 1 <?xml version="1.0" encoding="UTF-8"?>
 2 <?xml-stylesheet type="text/xsl" href="configuration.xsl"?>
 3 <!--
 4   Licensed under the Apache License, Version 2.0 (the "License");
 5   you may not use this file except in compliance with the License.
 6   You may obtain a copy of the License at
 7
 8     http://www.apache.org/licenses/LICENSE-2.0
 9
10   Unless required by applicable law or agreed to in writing, software
11   distributed under the License is distributed on an "AS IS" BASIS,
12   WITHOUT WARRANTIES OR CONDITIONS OF ANY KIND, either express or implied.
13   See the License for the specific language governing permissions and
14   limitations under the License. See accompanying LICENSE file.
15 -->
16
17 <!-- Put site-specific property overrides in this file. -->
18
19 <configuration>
20 <property>
21 <name>dfs.replication</name>
22   <value>2</value>
23 </property>
24 <property>
25   <name>dfs.namenode.name.dir</name>
26   <value>file:/data/hdfs/name</value>
27   <final>true</final>
28 </property>
29 <property>
30   <name>dfs.datanode.data.dir</name>
31   <value>file:/data/hdfs/data</value>
32   <final>true</final>
33 </property>
34 <property>
35   <name>dfs.namenode.secondary.http-address</name>
36   <value>master:9001</value>
37 </property>
38 <property>
39   <name>dfs.webhdfs.enabled</name>
40   <value>true</value>
41 </property>
42 <property>
43   <name>dfs.permissions</name>
44   <value>false</value>
45 </property>
46 </configuration>
注意:dfs.namenode.name.dir和dfs.datanode.data.dir的value填写对应前面创建的目录
3.4.3 修改vim mapred-site.xml
复制template,生成xml,命令如下:
cp mapred-site.xml.template mapred-site.xml
vim mapred-site.xml
 1 <?xml version="1.0"?>
 2 <?xml-stylesheet type="text/xsl" href="configuration.xsl"?>
 3 <!--
 4   Licensed under the Apache License, Version 2.0 (the "License");
 5   you may not use this file except in compliance with the License.
 6   You may obtain a copy of the License at
 7
 8     http://www.apache.org/licenses/LICENSE-2.0
 9
10   Unless required by applicable law or agreed to in writing, software
11   distributed under the License is distributed on an "AS IS" BASIS,
12   WITHOUT WARRANTIES OR CONDITIONS OF ANY KIND, either express or implied.
13   See the License for the specific language governing permissions and
14   limitations under the License. See accompanying LICENSE file.
15 -->
16
17 <!-- Put site-specific property overrides in this file. -->
18
19 <configuration>
20
21 <property>
22   <name>mapreduce.framework.name</name>
23   <value>yarn</value>
24 </property>
25
26 </configuration>
3.4.4 修改vim yarn-site.xml
vim yarn-site.xml
 1 <?xml version="1.0"?>
 2 <!--
 3   Licensed under the Apache License, Version 2.0 (the "License");
 4   you may not use this file except in compliance with the License.
 5   You may obtain a copy of the License at
 6
 7     http://www.apache.org/licenses/LICENSE-2.0
 8
 9   Unless required by applicable law or agreed to in writing, software
10   distributed under the License is distributed on an "AS IS" BASIS,
11   WITHOUT WARRANTIES OR CONDITIONS OF ANY KIND, either express or implied.
12   See the License for the specific language governing permissions and
13   limitations under the License. See accompanying LICENSE file.
14 -->
15 <configuration>
16
17 <!-- Site specific YARN configuration properties -->
18 <property>
19 <name>yarn.resourcemanager.address</name>
20   <value>master:18040</value>
21 </property>
22 <property>
23   <name>yarn.resourcemanager.scheduler.address</name>
24   <value>master:18030</value>
25 </property>
26 <property>
27   <name>yarn.resourcemanager.webapp.address</name>
28   <value>master:18088</value>
29 </property>
30 <property>
31   <name>yarn.resourcemanager.resource-tracker.address</name>
32   <value>master:18025</value>
33 </property>
34 <property>
35   <name>yarn.resourcemanager.admin.address</name>
36   <value>master:18141</value>
37 </property>
38 <property>
39   <name>yarn.nodemanager.aux-services</name>
40   <value>mapreduce.shuffle</value>
41 </property>
42 <property>
43   <name>yarn.nodemanager.aux-services.mapreduce.shuffle.class</name>
44   <value>org.apache.hadoop.mapred.ShuffleHandler</value>
45 </property>
46 </configuration>
由于我们已经配置了JAVA_HOME的环境变量,所以hadoop-env.sh与yarn-env.sh这两个文件不用修改,因为里面的配置是:
export JAVA_HOME=${JAVA_HOME}
3.4.5 修改data/hadoop-2.7.1/etc/hadoop/slaves
将原来的localhost删除,改成如下内容
vim /data/hadoop-2.7.1/etc/hadoop/slaves
 最后,将整个hadoop-2.7.1文件夹及其子文件夹使用scp复制到slave1和slave2的相同目录中:
scp -r /data/hadoop-2.7.1 root@slave1:/data
scp -r /data/hadoop-2.7.1 root@slave2:/data
 最后的执行结果如下图:


在Master上执行jps命令,得到如下结果:

4.3 启动DataNode
执行命令如下:
/data/hadoop-2.7.1/sbin/hadoop-daemons.sh start datanode
执行结果如下:
 master

slave1

slave2

说明Slave1和Slave2上的DataNode运行正常。
以上启动NameNode和DataNode的方式,可以用start-dfs.sh脚本替代:
/data/hadoop-2.7.1/sbin/start-all.sh
4.4 运行YARN
运行Yarn也有与运行HDFS类似的方式。启动ResourceManager使用以下命令:
以上方式我们就不赘述了,来看看使用start-yarn.sh的简洁的启动方式:
在Master上执行jps:
说明ResourceManager运行正常。
在两台Slave上执行jps,也会看到NodeManager运行正常,如下图:

4.5 查看集群是否启动成功: jps


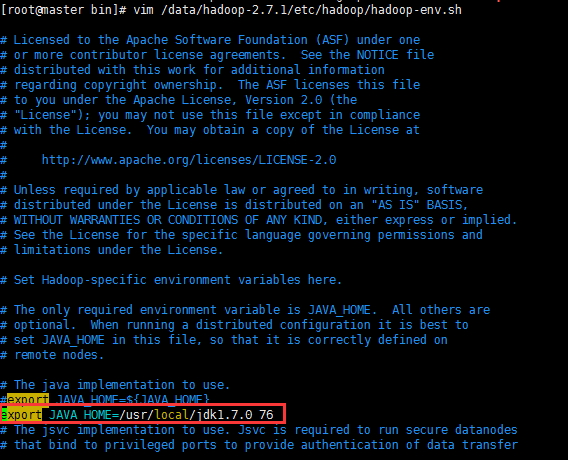
 则需要/data/hadoop-2.7.1/etc/hadoop/hadoop-env.sh,添加JAVA_HOME路径
Master显示:
SecondaryNameNode
ResourceManager
NameNode
Slave显示:
NodeManager
DataNode
五、测试hadoop
5.1 测试HDFS
最后测试下亲手搭建的Hadoop集群是否执行正常,测试的命令如下图所示:

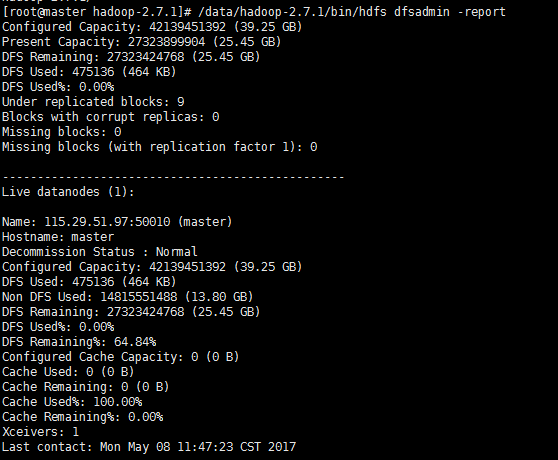
5.2 查看集群状态
/data/hadoop-2.7.1/bin/hdfs dfsadmin -report
5.3 测试YARN
可以访问YARN的管理界面,验证YARN,如下图所示:
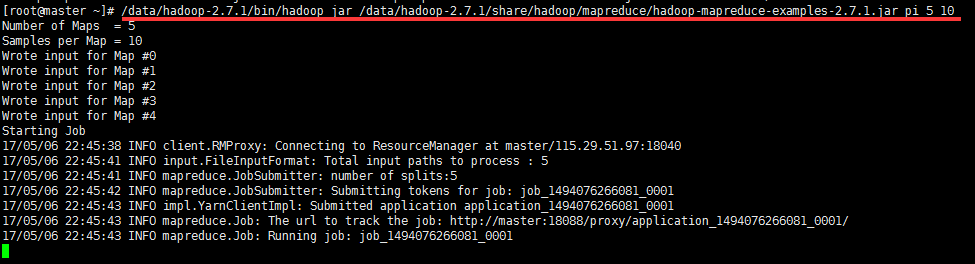
5.4 测试mapreduce
不想编写mapreduce代码。幸好Hadoop安装包里提供了现成的例子,在Hadoop的share/hadoop/mapreduce目录下。运行例子:
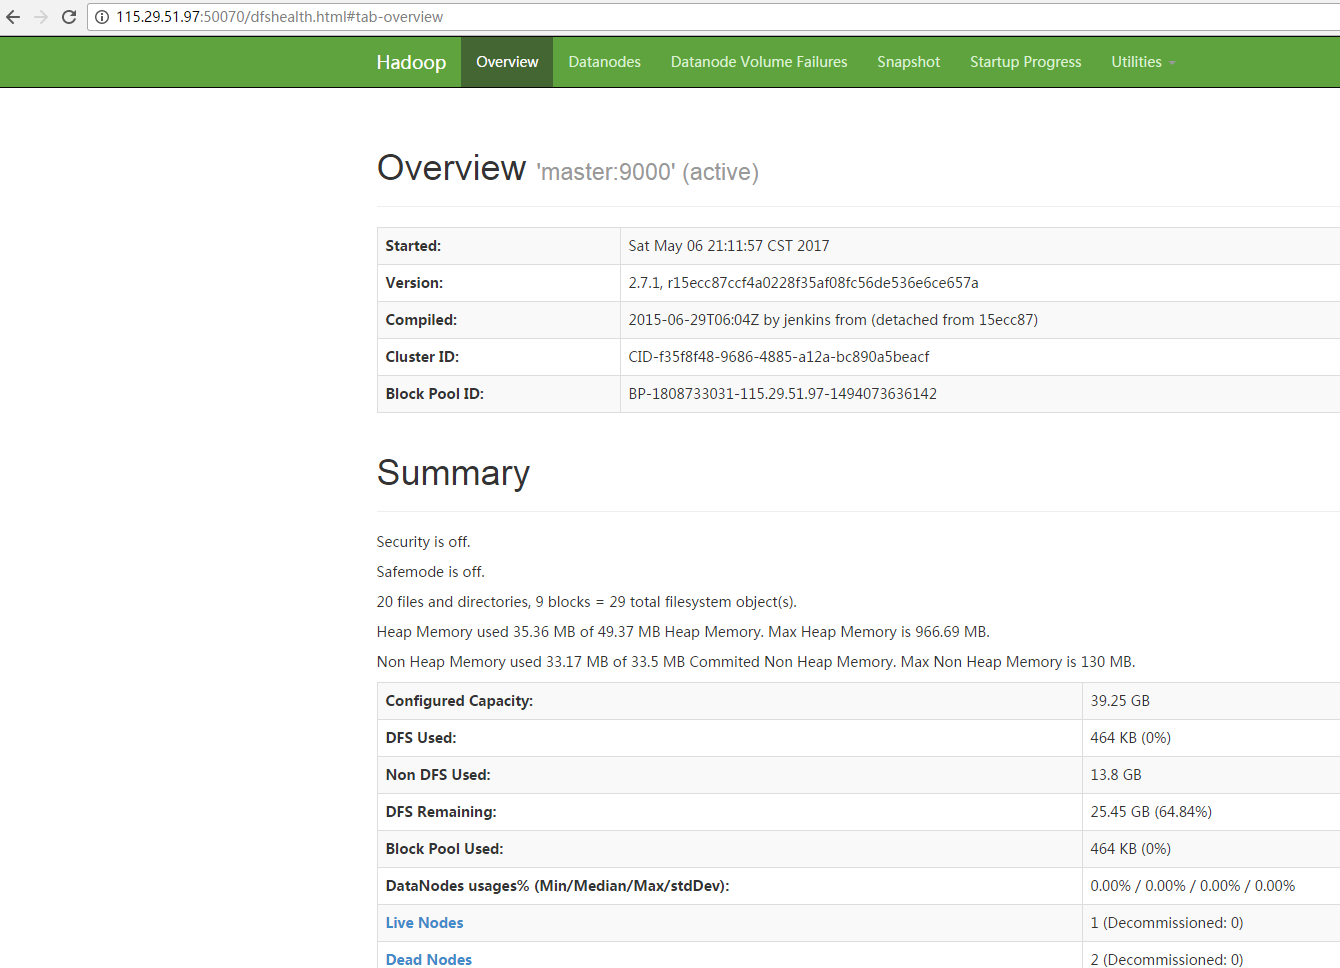
5.5 测试查看HDFS:
http://115.29.51.97:50070/dfshealth.html#tab-overview
六、配置运行Hadoop中遇见的问题
6.1 JAVA_HOME未设置?
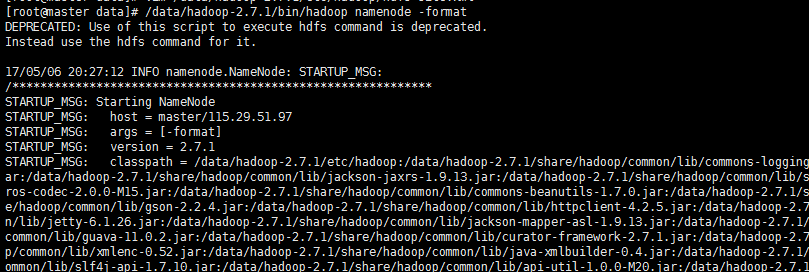
启动的时候报:
则需要/data/hadoop-2.7.1/etc/hadoop/hadoop-env.sh,添加JAVA_HOME路径
6.2 ncompatible clusterIDs
由于配置Hadoop集群不是一蹴而就的,所以往往伴随着配置——>运行——>。。。——>配置——>运行的过程,所以DataNode启动不了时,往往会在查看日志后,发现以下问题:
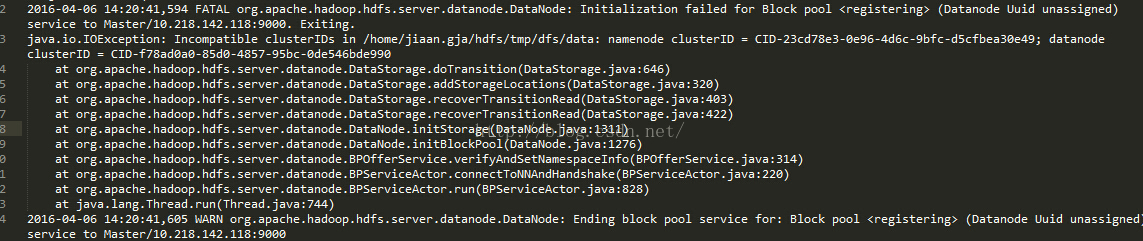
此问题是由于每次启动Hadoop集群时,会有不同的集群ID,所以需要清理启动失败节点上data目录(比如我创建的/home/jiaan.gja/hdfs/data)中的数据。
6.3 NativeCodeLoader的警告
在测试Hadoop时,细心的人可能看到截图中的警告信息:
