阅读目录:
- install configue gitlab-ci-multi-runner
- restore nuget packages
- bulid .sln
- run unit tests
- configue .gitlab-ci.yml
- configue build status badge image
CI 精华文章:
Gitlab 部署 CI 相关资料:
持续集成(Continuous integration – CI)的作用:代码在提交到资源库之前,进行构建、自动化测试和发布等等,我们每天需要提交大量的代码,持续集成可以有效的帮助我们发现代码中的 Bug,并且减少一些反复的工作等等,使团队更加有效的开发协作。
GitLab CI 官方介绍:https://about.gitlab.com/gitlab-ci/
Gitlab 在 8.0 以上版本集成了 CI,所以我们不需要另外配置一个 gitlab-ci-server 服务器,为我们部署减少了很多的工作,点个赞👍!
先吐槽下,Gitlab 部署 CI 我大概花了一周的时间,但也只是进行了一点点,最重要的三点:nuget restore, bulid *.sln和run unit tests现在基本上是可以了,在部署的过程中,深感到问题分享的重要性,遇到的大量问题,Google 基本上搜不到,中文相关资料也就上面的几篇文章,但看过之后发现都是简简单单的介绍而已,并没有记录详细的部署过程,所以,我基本上都是看的 Gitlab 官方帮助文档,但 Gitlab 的更新很频繁,所以有些帮助文档都没进行更新,避免不了踩进一些坑,那怎么办呢?解决方式就是不断的进行尝试,比如我配置.gitlab-ci.yml文件的时候,就不断的进行code commit测试(一百多个提交😂):

并且有先见之明的把问题解决过程,都用 Issue 进行记录了😏:

下面就从上面这几个 Issue 进行展开,把每个问题和解决过程都分享出来,希望可以帮助到遇到相同问题的园友。
1. install configue gitlab-ci-multi-runner
GitLab 部署 CI 的第一步就是安装 gitlab-ci-multi-runner,你可以把它理解为:跑 CI 的服务。
windows 安装教程:https://gitlab.com/gitlab-org/gitlab-ci-multi-runner/blob/master/docs/install/windows.md
下载好 gitlab-ci-multi-runner-windows-amd64.exe 安装文件后,将安装文件放在C:\Multi-Runner下,以管理员权限运行命令行,如果gitlab-ci-multi-runner命令找不到,直接用gitlab-ci-multi-runner-windows-amd64.exe命令运行。
在 Gitlab 项目中打开 Settings > Runners,找到URL和token,等会安装的时候需要配置。
安装配置步骤:
C:\WINDOWS\system32>cd C:\Multi-Runner

C:\Multi-Runner>gitlab-ci-multi-runner-windows-amd64.exe register
Please enter the gitlab-ci coordinator URL (e.g. https://gitlab.com/ci):
URL
Please enter the gitlab-ci token for this runner:
token
Please enter the gitlab-ci description for this runner:
[DESKTOP-2P9GHDD]: xishuai-ci
Please enter the gitlab-ci tags for this runner (comma separated):
dev
Registering runner... succeeded                     runner=avuSXASJ
Please enter the executor: docker-ssh, parallels, shell, ssh, virtualbox, docker+machine, docker-ssh+machine, docker:
shell
Runner registered successfully. Feel free to start it, but if it's running already the config should be automatically reloaded!上面executor: shell是默认配置,意思是本地执行,也可以使用ssh和docker,不过需要增加一些远端链接配置。
完成后,会在C:\Multi-Runner目录下,生成一个config.toml配置文件,我们上面输入的配置信息也都会在这里面,配置说明:https://gitlab.com/gitlab-org/gitlab-ci-multi-runner/blob/master/docs/configuration/advanced-configuration.md
停止,运行和验证命令:
C:\Multi-Runner>gitlab-ci-multi-runner-windows-amd64.exe stop

C:\Multi-Runner>gitlab-ci-multi-runner-windows-amd64.exe start

C:\Multi-Runner>gitlab-ci-multi-runner-windows-amd64.exe verify
Verifying runner... is alive runner=5ae63365如果运行C:\Multi-Runner>gitlab-ci-multi-runner-windows-amd64.exe start出现错误,则需要将gitlab-ci-multi-runner-windows-amd64.exe拷贝一份,重命名为gitlab-ci-multi-runner.exe。
另外, Gitlab 项目 Settings > Project Settings Features > Builds 选项需要打勾。
gitlab-ci-multi-runner 安装配置完之后,我们就可以在 Gitlab 项目 Settings > Runners 中,看到 Runners 的信息了。

2. restore nuget packages
这次任务:使用 CI, nuget 还原解决方案中的程序包。
gitlab-ci-multi-runner 安装配置完之后,我们还需要在 Gitlab 项目中添加一个.gitlab-ci.yml文件,官方介绍:http://doc.gitlab.com/ee/ci/yaml/README.html
因为一开始我对.gitlab-ci.yml配置一点都不了解,所以,我当时按照这个教程 CI Quick Start,添加了如下的.gitlab-ci.yml文件配置:
before_script:
  - apt-get update -qq && apt-get install -y -qq sqlite3 libsqlite3-dev nodejs
  - ruby -v
  - which ruby
  - gem install bundler --no-ri --no-rdoc
  - bundle install --jobs $(nproc)  "${FLAGS[@]}"

rspec:
  script:
    - bundle exec rspec

rubocop:
  script:
- bundle exec rubocop添加好.gitlab-ci.yml文件配置后,我们就可以在项目中的 Builds,看到提交后的构建工作了,随便在 Gitlab 项目中添加一个解决方案,然后再添加一个类库项目,并且使用 nuget 安装一个程序包,最后使用 git 提交到 Gitlab 中,就可以看到 Builds 的过程和结果了,首次提交结果如下:
gitlab-ci-multi-runner 1.1.3 (a470667)
Using Shell executor...
Running on DESKTOP-2P9GHDD...
Cloning repository...
'"git"' �����ڲ����ⲿ���Ҳ���ǿ����еij���
���������ļ���
ϵͳ�Ҳ���ָ����·����
Checking out 2f82ccb0 as master...
'"git"' �����ڲ����ⲿ���Ҳ���ǿ����еij���
���������ļ���
ERROR: Build failed: exit status 9009这个问题搞了我很久,因为错误信息乱码了,根本找不到相关的解决方案,后来无意间搜到 Gitlab 中的一个 Issue,里面提到了一个gitlab-ci-multi-runner --debug run命令,意思是调试运行 CI,这样我们就可以看到详细的错误信息了,debug 的错误信息比较多,并且完全看不懂,不过我们可以通过 Builds 看到简洁的错误日志:
gitlab-ci-multi-runner 1.1.3 (a470667)
Using Shell executor...
Running on DESKTOP-2P9GHDD...
Cloning repository...
Cloning into 'C:/Multi-Runner/builds/500c7a25/0/dev/CNBlogsCI-Sample'...
fatal: unable to access 'https://gitlab-ci-token:xxxxxx@gitlab.com/dev/CNBlogsCI-Sample.git/': error setting certificate verify locations:
  CAfile: C:\Multi-Runner\builds\500c7a25\0\dev\CNBlogsCI-Sample.tmp\GIT_SSL_CAINFO
  CApath: none
The system cannot find the path specified.
Checking out ac05d090 as master...
fatal: Not a git repository (or any of the parent directories): .git

ERROR: Build failed: exit status 128上面错误日志的意思是,没有git clone repository成功,并且没有权限访问,后来 Google 到了一个解决方案:error setting certificate verify locations
解决方式:C:\Multi-Runner\config.toml文件添加shell = 'powershell'节点,添加在[[runners]]节点后。
解决完这个问题之后,去研究了下.gitlab-ci.yml中的nuget restore配置(Google 搜的,太坑),将.gitlab-ci.yml文件修改如下:
stages:
  - build

job:
  stage: build
  script:
  - ls
  - echo "Restoring NuGet Packages..."
- '"C:\Users\xishuai\.dnx\packages\ClassLibrary2\2.0.0\packages\NuGet.CommandLine.2.8.5\tools\NuGet.exe" restore "src/CNBlogsCI-Sample.sln"'commit提交测试,出现下面的错误信息:
gitlab-ci-multi-runner 1.1.3 (a470667)
Using Shell executor...
At C:\Users\xishuai\AppData\Local\Temp\build_script140243225\script.ps1:132 char:105
+ ... 0.0\packages\NuGet.CommandLine.2.8.5\tools\NuGet.exe" restore "src/CN ...
+                                                           ~~~~~~~
Unexpected token 'restore' in expression or statement.
    + CategoryInfo          : ParserError: (:) [], ParseException
    + FullyQualifiedErrorId : UnexpectedToken


ERROR: Build failed: exit status 1从错误信息中可以看到,没有识别restore命令,啥意思?这个问题又搞了我好久,Google Unexpected token 'restore' in expression or statement. 关键字,毛都搜不到,没办法,后来只能更换关键字搜,但搜到的信息凤毛麟角,后来参考搜来的资料,将.gitlab-ci.yml改为:
stages:
  - build

job:
  stage: build
  script:
  - ls
  - echo "Restoring NuGet Packages..."
  - 'call "%VS140COMNTOOLS%\vsvars32.bat"'
#  - '"C:\Users\xishuai\.dnx\packages\ClassLibrary2\2.0.0\packages\NuGet.CommandLine.2.8.5\tools\NuGet.exe" restore "src\CNBlogsCI-Sample.sln"'
或
before_script:
  - echo "Restoring NuGet Packages..."
  - 'call "C:\Program Files (x86)\Microsoft Visual Studio 14.0\Common7\Tools\vsvars32.bat"'
%VS140COMNTOOLS%\vsvars32.bat 是什么鬼?不太清楚,毫无疑问,又出现了错误,信息如下:
gitlab-ci-multi-runner 1.1.3 (a470667)
Using Shell executor...
Running on DESKTOP-2P9GHDD...
Fetching changes...
HEAD is now at 3926803 Update .gitlab-ci.yml
From https://gitlab.com/dev/CNBlogsCI-Sample
   3926803..d8f10a7  master     -> origin/master
Checking out d8f10a7c as master...
Previous HEAD position was 3926803... Update .gitlab-ci.yml
HEAD is now at d8f10a7... Update .gitlab-ci.yml
$ ls


    Directory: C:\Multi-Runner\builds\5ae63365\0\dev\CNBlogsCI-Sample


Mode                LastWriteTime         Length Name
----                -------------         ------ ----
d-----         5/4/2016  02:45 PM                src
-a----         5/4/2016  02:45 PM             89 .gitignore
-a----         5/4/2016  02:49 PM            527 .gitlab-ci.yml
$ echo "Restoring NuGet Packages..."
Restoring NuGet Packages...
$ call "%VS140COMNTOOLS%\vsvars32.bat"
call : The term 'call' is not recognized as the name of a cmdlet, function, script file, or operable program. Check
the spelling of the name, or if a path was included, verify that the path is correct and try again.
At C:\Users\xishuai\AppData\Local\Temp\build_script250102679\script.ps1:132 char:3
+   call "%VS140COMNTOOLS%\vsvars32.bat"
+   ~~~~
    + CategoryInfo          : ObjectNotFound: (call:String) [], ParentContainsErrorRecordException
    + FullyQualifiedErrorId : CommandNotFoundException


ERROR: Build failed: exit status 1也是毫无头绪的错误,这么办呢?后来想想nuget restore始终不成功,能不能换个命令呢?突然想到了 ASP.NET 5,还原程序包使用的是dnu restore命令,那就尝试下吧,将解决方案中的项目删掉,然后添加 ASP.NET 5 项目,.gitlab-ci.yml改为:
before_script:
  - echo "Restoring NuGet Packages..."
  - dnvm use 1.0.0-beta5 -r coreclr -a x64
  - dnu restore
哇塞,这次终于成功了(突然有种想哭的冲动😭),日志信息:
Running on DESKTOP-2P9GHDD...
Fetching changes...
HEAD is now at 33436d8 test commit
From https://gitlab.com/dev/CNBlogsCI-Sample
   33436d8..c80b2d5  master     -> origin/master
Checking out c80b2d5d as master...
Previous HEAD position was 33436d8... test commit
HEAD is now at c80b2d5... test commit
$ echo "Release build..."
Release build...
$ dnvm use 1.0.0-beta5 -r coreclr -a x64
Adding C:\Users\xishuai\.dnx\runtimes\dnx-coreclr-win-x64.1.0.0-beta5\bin to process PATH
$ dnu restore
Microsoft .NET Development Utility CoreCLR-x64-1.0.0-beta5-12103

Restoring packages for C:\Multi-Runner\builds\5ae63365\0\dev\CNBlogsCI-Sample\src\CNBlogsCI-Sample.ClassLibrary\project.json
  GET https://www.nuget.org/api/v2/
  OK https://www.nuget.org/api/v2/ 5524ms
  GET http://nuget.cnitblog.com/nuget/Default/
  OK http://nuget.cnitblog.com/nuget/Default/ 2406ms
  GET https://www.myget.org/F/aspnetvnext/api/v2/
  OK https://www.myget.org/F/aspnetvnext/api/v2/ 5225ms
  CACHE https://www.nuget.org/api/v2/
  GET https://www.myget.org/F/aspnetmaster/api/v3/index.json
  OK https://www.myget.org/F/aspnetmaster/api/v3/index.json 2938ms
  GET https://www.myget.org/F/xunit/api/v3/index.json
  OK https://www.myget.org/F/xunit/api/v3/index.json 1976ms
Writing lock file C:\Multi-Runner\builds\5ae63365\0\dev\CNBlogsCI-Sample\src\CNBlogsCI-Sample.ClassLibrary\project.lock.json
Restore complete, 18775ms elapsed

Build succeeded
虽然 ASP.NET 5 还原程序包成功了,但依旧解决不了问题啊,因为必须得解决nuget restore的问题,因为很多项目都没用 ASP.NET 5,怎么办呢?又回到了出发点,问题能磨死人啊,过程就不叙述了,后来无意间将.gitlab-ci.yml改为:
before_script:
  - echo "Restoring NuGet Packages..."
- C:\Program Files (x86)\NuGet\nuget.exe restore src/CNBlogsCI-Sample.sln仔细看看和上面的配置有什么不同,我把'"去掉了,commit代码测试,出现了下面和一开始不一样的错误(有戏了😏):
gitlab-ci-multi-runner 1.1.3 (a470667)
Using Shell executor...
Running on DESKTOP-2P9GHDD...
Fetching changes...
Removing src/ClassLibrary1/bin/
Removing src/ClassLibrary1/obj/
HEAD is now at 191e7e0 test commit
From https://gitlab.com/dev/CNBlogsCI-Sample
   191e7e0..feebdef  master     -> origin/master
Checking out feebdefb as master...
Previous HEAD position was 191e7e0... test commit
HEAD is now at feebdef... test commit
$ echo "Restoring NuGet Packages..."
Restoring NuGet Packages...
$ C:\Program Files (x86)\NuGet\nuget.exe restore src/CNBlogsCI-Sample.sln
x86 : The term 'x86' is not recognized as the name of a cmdlet, function, script file, or operable program. Check the
spelling of the name, or if a path was included, verify that the path is correct and try again.
At C:\Users\xishuai\AppData\Local\Temp\build_script166211738\script.ps1:128 char:21
+   C:\Program Files (x86)\NuGet\nuget.exe restore src/CNBlogsCI-Sample ...
+                     ~~~
    + CategoryInfo          : ObjectNotFound: (x86:String) [], ParentContainsErrorRecordException
    + FullyQualifiedErrorId : CommandNotFoundException


ERROR: Build failed: exit status 1根据上面的错误日志,可以看到,就是目录中的x86问题,然后我把目录改为C:\Program Files\NuGet\nuget.exe之后(nuget.exe拷贝到相应目录下),还是有问题,然后就直接放在C盘目录下,终于build成功(眼泪夺眶而出😂)。
.gitlab-ci.yml配置:
before_script:
  - echo "Restoring NuGet Packages..."
- C:\NuGet\nuget.exe restore "src\CNBlogsCI-Sample.sln"build成功日志:
gitlab-ci-multi-runner 1.1.3 (a470667)
Using Shell executor...
Running on DESKTOP-2P9GHDD...
Fetching changes...
HEAD is now at 1ac80d7 test commit
From https://gitlab.com/dev/CNBlogsCI-Sample
   1ac80d7..683a8bc  master     -> origin/master
Checking out 683a8bcb as master...
Previous HEAD position was 1ac80d7... test commit
HEAD is now at 683a8bc... test commit
$ echo "Restoring NuGet Packages..."
Restoring NuGet Packages...
$ C:\NuGet\nuget.exe restore "src\CNBlogsCI-Sample.sln"
Installing 'AutoMapper 4.2.1'.
Successfully installed 'AutoMapper 4.2.1'.

Build succeeded
看似简单的结果,但过程真是太扯蛋了,如果我当时看到类似这篇博文分享,也不至于如此,还没完,继续。。。
3. build *.sln
这次任务:使用 CI, build 生成解决方案中的项目。
生成解决方案的问题解决过程相对简单些,不过上面漏掉了一处,这边再补充下,.gitlab-ci.yml配置:
stages:
  - build

job:
  stage: build
  script:
  - echo "Release build..."
  - C:\Windows\Microsoft.NET\Framework64\v4.0.30319\msbuild.exe /consoleloggerparameters:ErrorsOnly /maxcpucount /nologo /property:Configuration=Release /verbosity:quiet "CNBlogsCI-Sample.sln"
  tags:
  except:
  - tags
错误日志:
gitlab-ci-multi-runner 1.1.3 (a470667)
Using Shell executor...
Running on DESKTOP-2P9GHDD...
Fetching changes...
HEAD is now at 07a6ffd Merge branch 'master' of gitlab.com:dev/CNBlogsCI-Sample
From https://gitlab.com/dev/CNBlogsCI-Sample
   07a6ffd..73bd820  master     -> origin/master
Checking out 73bd8207 as master...
Previous HEAD position was 07a6ffd... Merge branch 'master' of gitlab.com:dev/CNBlogsCI-Sample
HEAD is now at 73bd820... test commit
$ echo "Release build..."
Release build...
$ C:\Windows\Microsoft.NET\Framework64\v4.0.30319\msbuild.exe /consoleloggerparameters:ErrorsOnly /maxcpucount /nologo /property:Configuration=Release /verbosity:quiet "CNBlogsCI-Sample.sln"
MSBUILD : error MSB1009: ��Ŀ�ļ������ڡ�
����: CNBlogsCI-Sample.sln

ERROR: Build failed: exit status 1
这个错误和最开始的乱码错误一样,未知的错误,无从下手,后来,又无意间搜到了一个 Gitlab Issue(好多无意间😄,没办法,Google 只能搜索所有可能的关键字):Question about local project path
.gitlab-ci.yml配置改为:
stages:
  - build

job:
  stage: build
  script:
  - ls
  - echo "Release build..."
  - C:\Windows\Microsoft.NET\Framework64\v4.0.30319\msbuild.exe /consoleloggerparameters:ErrorsOnly /maxcpucount /nologo /property:Configuration=Release /verbosity:quiet "CNBlogsCI-Sample.sln"
  tags:
  except:
  - tags
然后看到了详细错误(又有戏了😏):
gitlab-ci-multi-runner 1.1.3 (a470667)
Using Shell executor...
Running on DESKTOP-2P9GHDD...
Fetching changes...
HEAD is now at eb2ec26 Update .gitlab-ci.yml
Checking out eb2ec265 as master...
HEAD is now at eb2ec26... Update .gitlab-ci.yml
$ ls


    Directory: C:\Multi-Runner\builds\5ae63365\0\dev\CNBlogsCI-Sample


Mode                LastWriteTime         Length Name
----                -------------         ------ ----
d-----         5/4/2016  10:26 AM                src
-a----         5/4/2016  11:19 AM            315 .gitlab-ci.yml
$ echo "Release build..."
Release build...
$ C:\Windows\Microsoft.NET\Framework64\v4.0.30319\msbuild.exe /consoleloggerparameters:ErrorsOnly /maxcpucount /nologo /property:Configuration=Release /verbosity:quiet "CNBlogsCI-Sample.sln"
MSBUILD : error MSB1009: Project file does not exist.
Switch: CNBlogsCI-Sample.sln


ERROR: Build failed: exit status 1
error MSB1009: Project file does not exist.这个错误就很清晰了,项目文件找不到,也就是没有找到CNBlogsCI-Sample.sln,怎么会呢?重新查看了 Gitlab 中的项目文件目录,CNBlogsCI-Sample.sln在根目录下的src目录下,重新修改下.gitlab-ci.yml配置:
stages:
  - build

job:
  stage: build
  script:
  - ls
  - echo "Release build..."
  - C:\Windows\Microsoft.NET\Framework64\v4.0.30319\msbuild.exe /consoleloggerparameters:ErrorsOnly /maxcpucount /nologo /property:Configuration=Release /verbosity:quiet "src/CNBlogsCI-Sample.sln"
  tags:
  except:
- tagsbuild成功,日志详情:
gitlab-ci-multi-runner 1.1.3 (a470667)
Using Shell executor...
Running on DESKTOP-2P9GHDD...
Fetching changes...
HEAD is now at a51aeea test commit
From https://gitlab.com/dev/CNBlogsCI-Sample
   a51aeea..170fbc4  master     -> origin/master
Checking out 170fbc4a as master...
Previous HEAD position was a51aeea... test commit
HEAD is now at 170fbc4... test commit
$ ls


    Directory: C:\Multi-Runner\builds\5ae63365\0\dev\CNBlogsCI-Sample


Mode                LastWriteTime         Length Name
----                -------------         ------ ----
d-----         5/4/2016  11:38 AM                src
-a----         5/4/2016  11:38 AM            319 .gitlab-ci.yml
$ echo "Release build..."
Release build...
$ C:\Windows\Microsoft.NET\Framework64\v4.0.30319\msbuild.exe /consoleloggerparameters:ErrorsOnly /maxcpucount /nologo /property:Configuration=Release /verbosity:quiet "src/CNBlogsCI-Sample.sln"


Build succeeded
4. run unit tests
这次任务:使用 CI, run 跑解决方案中的单元测试,可以成为自动化测试。
这次基本上没有什么问题解决过程,因为 Google 完全搜不到相关资料,所以,我最后是按照我的想法实现的,xUnit 除了用 VS2015 进行跑单元测试外,我们还可以用命令行的方式,打开 cmd 输入:C:\xunit.runner.console\tools\xunit.console.exe "src\ClassLibrary2\bin\debug\ClassLibrary2.dll",结果如下:
C:\Users\xishuai\Desktop\CNBlogs\CNBlogsCI-Sample\src> C:\xunit.runner.console\tools\xunit.console.exe "src\ClassLibrary2\bin\debug\ClassLibrary2.dll"
xUnit.net Console Runner (64-bit .NET 4.0.30319.42000)
  Discovering: ClassLibrary2
  Discovered:  ClassLibrary2
  Starting:    ClassLibrary2
    ClassLibrary2.Class1.Test2 [FAIL]
      Assert.True() Failure
      Expected: True
      Actual:   False
      Stack Trace:
        ClassLibrary2\Class1.cs(21,0): at ClassLibrary2.Class1.Test2()
  Finished:    ClassLibrary2
=== TEST EXECUTION SUMMARY ===
ClassLibrary2 Total: 2, Errors: 0, Failed: 1, Skipped: 0, Time: 0.224s好,既然命令行可以跑单元测试,那么我们就可以在.gitlab-ci.yml中添加脚本配置,如下:
stages:
  - build
  - test

before_script:
  - echo "Restoring NuGet Packages..."
  - C:\NuGet\nuget.exe restore "src\CNBlogsCI-Sample.sln"

build_job:
  stage: build
  script:
  - echo "Release build..."
  - C:\Windows\Microsoft.NET\Framework64\v4.0.30319\msbuild.exe /consoleloggerparameters:ErrorsOnly /maxcpucount /nologo /property:Configuration=Release /verbosity:quiet "src\CNBlogsCI-Sample.sln"
  except:
  - tags

test_job:
  stage: test
  script:
  - echo "Tests run..."
  - C:\xunit.runner.console\tools\xunit.console.exe "src\ClassLibrary2\bin\debug\ClassLibrary2.dll"
  - C:\xunit.runner.console\tools\xunit.console.exe "src\ClassLibrary3\bin\debug\ClassLibrary3.dll"
xUnit 单元测试不通过日志:
gitlab-ci-multi-runner 1.1.3 (a470667)
Using Shell executor...
Running on DESKTOP-2P9GHDD...
Fetching changes...
Removing src/ClassLibrary1/bin/
Removing src/ClassLibrary1/obj/
Removing src/ClassLibrary2/bin/Release/
Removing src/ClassLibrary2/obj/
Removing src/ClassLibrary3/bin/
Removing src/ClassLibrary3/obj/
Removing src/packages/
HEAD is now at d176025 test commit
Checking out d1760259 as master...
HEAD is now at d176025... test commit
$ echo "Restoring NuGet Packages..."
Restoring NuGet Packages...
$ C:\NuGet\nuget.exe restore "src\CNBlogsCI-Sample.sln"
Installing 'xunit.abstractions 2.0.0'.
Installing 'xunit.assert 2.1.0'.
Installing 'xunit 2.1.0'.
Installing 'AutoMapper 4.2.1'.
Successfully installed 'xunit 2.1.0'.
Installing 'xunit.core 2.1.0'.
Successfully installed 'xunit.abstractions 2.0.0'.
Successfully installed 'xunit.core 2.1.0'.
Installing 'xunit.extensibility.core 2.1.0'.
Successfully installed 'xunit.assert 2.1.0'.
Installing 'xunit.extensibility.execution 2.1.0'.
Installing 'xunit.runner.console 2.1.0'.
Successfully installed 'AutoMapper 4.2.1'.
Successfully installed 'xunit.runner.console 2.1.0'.
Successfully installed 'xunit.extensibility.core 2.1.0'.
Successfully installed 'xunit.extensibility.execution 2.1.0'.
$ echo "Tests run..."
Tests run...
$ C:\xunit.runner.console\tools\xunit.console.exe "src\ClassLibrary2\bin\debug\ClassLibrary2.dll"
xUnit.net Console Runner (64-bit .NET 4.0.30319.42000)
  Discovering: ClassLibrary2
  Discovered:  ClassLibrary2
  Starting:    ClassLibrary2
  Finished:    ClassLibrary2
=== TEST EXECUTION SUMMARY ===
   ClassLibrary2  Total: 2, Errors: 0, Failed: 0, Skipped: 0, Time: 0.179s
$ C:\xunit.runner.console\tools\xunit.console.exe "src\ClassLibrary3\bin\debug\ClassLibrary3.dll"
error: file not found: src\ClassLibrary3\bin\debug\ClassLibrary3.dll

ERROR: Build failed: exit status 1
xUnit 单元测试通过日志:
gitlab-ci-multi-runner 1.1.3 (a470667)
Using Shell executor...
Running on DESKTOP-2P9GHDD...
Fetching changes...
Removing src/ClassLibrary1/bin/
Removing src/ClassLibrary1/obj/
Removing src/ClassLibrary2/bin/Release/
Removing src/ClassLibrary2/obj/
Removing src/ClassLibrary3/bin/Release/
Removing src/ClassLibrary3/obj/
Removing src/packages/
HEAD is now at 2467772 test commit
Checking out 2467772f as master...
HEAD is now at 2467772... test commit
$ echo "Restoring NuGet Packages..."
Restoring NuGet Packages...
$ C:\NuGet\nuget.exe restore "src\CNBlogsCI-Sample.sln"
Installing 'AutoMapper 4.2.1'.
Installing 'xunit.abstractions 2.0.0'.
Installing 'xunit.assert 2.1.0'.
Installing 'xunit 2.1.0'.
Successfully installed 'xunit 2.1.0'.
Installing 'xunit.core 2.1.0'.
Successfully installed 'xunit.abstractions 2.0.0'.
Successfully installed 'xunit.core 2.1.0'.
Installing 'xunit.extensibility.execution 2.1.0'.
Installing 'xunit.extensibility.core 2.1.0'.
Successfully installed 'xunit.assert 2.1.0'.
Installing 'xunit.runner.console 2.1.0'.
Successfully installed 'AutoMapper 4.2.1'.
Successfully installed 'xunit.runner.console 2.1.0'.
Successfully installed 'xunit.extensibility.core 2.1.0'.
Successfully installed 'xunit.extensibility.execution 2.1.0'.
$ echo "Tests run..."
Tests run...
$ C:\xunit.runner.console\tools\xunit.console.exe "src\ClassLibrary2\bin\debug\ClassLibrary2.dll"
xUnit.net Console Runner (64-bit .NET 4.0.30319.42000)
  Discovering: ClassLibrary2
  Discovered:  ClassLibrary2
  Starting:    ClassLibrary2
  Finished:    ClassLibrary2
=== TEST EXECUTION SUMMARY ===
   ClassLibrary2  Total: 2, Errors: 0, Failed: 0, Skipped: 0, Time: 0.194s
$ C:\xunit.runner.console\tools\xunit.console.exe "src\ClassLibrary3\bin\debug\ClassLibrary3.dll"
xUnit.net Console Runner (64-bit .NET 4.0.30319.42000)
  Discovering: ClassLibrary3
  Discovered:  ClassLibrary3
  Starting:    ClassLibrary3
  Finished:    ClassLibrary3
=== TEST EXECUTION SUMMARY ===
   ClassLibrary3  Total: 1, Errors: 0, Failed: 0, Skipped: 0, Time: 0.184s

Build succeeded
基本上实现了我们想要的效果,但这种实现方式有两个不好的地方:
- 需要将单元测试的
*.dll文件上传到 git 资源库。 - 每增加一个单元测试项目,就必须在
.gitlab-ci.yml中添加一段脚本。
我个人觉得 CI 中的自动化测试,肯定不是像我这样搞的,但实在找不到相关资料,如果大家知悉,还请告知,感谢~
另外,如果是 ASP.NET 5 项目,进行自动化测试配置,会非常简单,配置如下:
test:
  stage: test
  script:
  - echo "Tests run..."
  - dnx test #或者 dotnet test
5. configue .gitlab-ci.yml
.gitlab-ci.yml官方资料:http://doc.gitlab.com/ee/ci/yaml/README.html
其他示例:
- http://stackoverflow.com/questions/32964953/gitlab-ci-and-msbuild-with-tests
- https://github.com/CWISoftware/accounts/blob/master/.gitlab-ci.yml
- http://www.timtilberg.com/tag/gitlab/
- http://doc.gitlab.com/ee/ci/yaml/README.html#stages
- https://github.com/travis-ci/travis-ci/issues/5210
.gitlab-ci.yml中的配置说明,上面的官方资料介绍的非常详细,下面我再简单介绍下,就用我这次部署 CI 完善后的.gitlab-ci.yml配置:
stages:
  - build
  - test

before_script:
  - echo "Restoring NuGet Packages..."
  - C:\NuGet\nuget.exe restore "src\CNBlogsCI-Sample.sln"
  only:
  - master

build_job:
  stage: build
  script:
  - echo "Release build..."
  - C:\Windows\Microsoft.NET\Framework64\v4.0.30319\msbuild.exe /consoleloggerparameters:ErrorsOnly /maxcpucount /nologo /property:Configuration=Release /verbosity:quiet "src\CNBlogsCI-Sample.sln"
  except:
  - tags
  only:
  - master

test_job:
  stage: test
  script:
  - echo "Tests run..."
  - C:\xunit.runner.console\tools\xunit.console.exe "src\ClassLibrary2\bin\debug\ClassLibrary2.dll"
  - C:\xunit.runner.console\tools\xunit.console.exe "src\ClassLibrary3\bin\debug\ClassLibrary3.dll"
  only:
- masterstage翻译为阶段的意思,在构建的过程中,必须要有一个先后顺序,最上面的stages配置意思是,先构建阶段为build的job,然后再构建阶段为test的job,下面build_job和test_job都是job,如果不配置stages,默认为:
stages:
  - build
  - test
- deploybefore_script的意思是,执行在所有的job之前的脚本,比如构建build_job和test_job都先执行before_script,build_job和test_job中的stage配置,意思是此job属于哪个stage,这个stage就是最上面的stages配置,除了默认的build,test和deploy,你也可以添加自定义的stage,另外,如果job不添加stage配置,默认配置为test,比如上面的test_job,就可以省略stage: test配置。
另外,job还有一个when: on_failure/on_success /always配置,如果我们对job进行了stage配置,默认都会是when: on_success:

only - master的意思是,只有`master分支才会进行构建,script的意思很明了,就是要执行的脚本命名。
6. configue build status badge image
构建状态徽章,就是我们平常在 Github 项目中看到构建图标,有pass和failing等等。
Gitlab CI 中的教程 builds-badge 真的很坑爹,怎么试都不行,后来无意间看到 Gitlab 项目的一个选项 Settings > Badges:
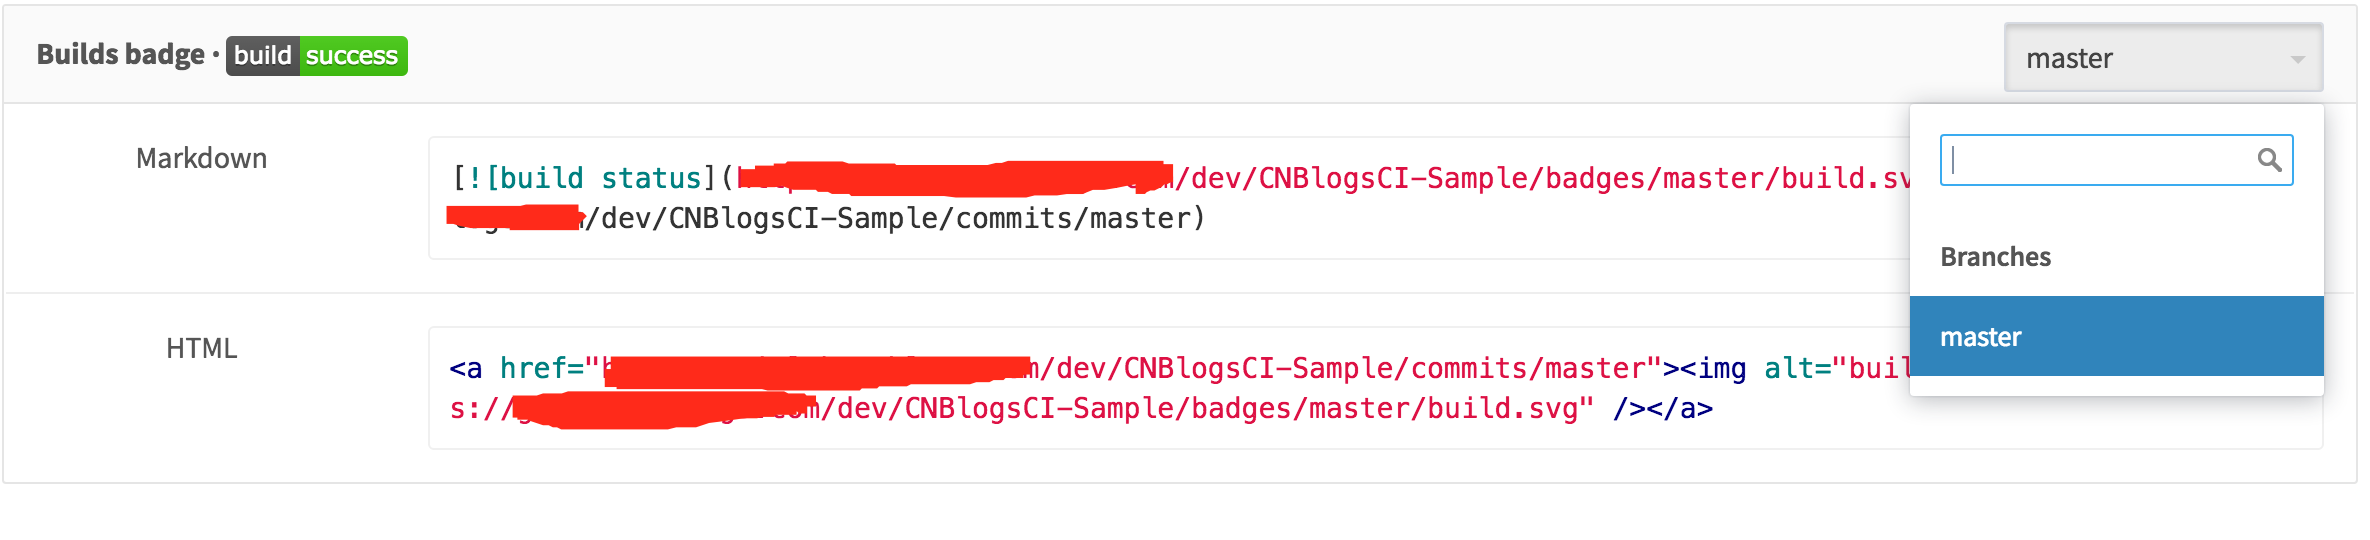
复制上面的代码,然后添加在README.md文件中:
[](https://gitlab.com/dev/CNBlogsCI-Sample/commits/master)这样在commit``bulid的时候,就会动态的显示bulid的过程和结果,并且是图片显示。

Gitlab 部署好 CI 之后,我们会发现,在项目中随处可见这样的图标:

这篇博文没有什么阅读价值,因为都是零零碎碎的问题和解决纪录,没有什么可读性,如果你能阅读到这,我真的会很感动。
分享是有价值的一件事,如果园友在遇到相同问题的时候,可以 Google 到这篇博文,那写这篇博文也就值了😏。